
As most of you know, I've been working on my free curbside dresser. It's been slow going because I've only been able to find a couple hours a day to work on it. It needs a lot of work in the patching and painting area. The patching part isn't too bad, but it's been a learning experience.

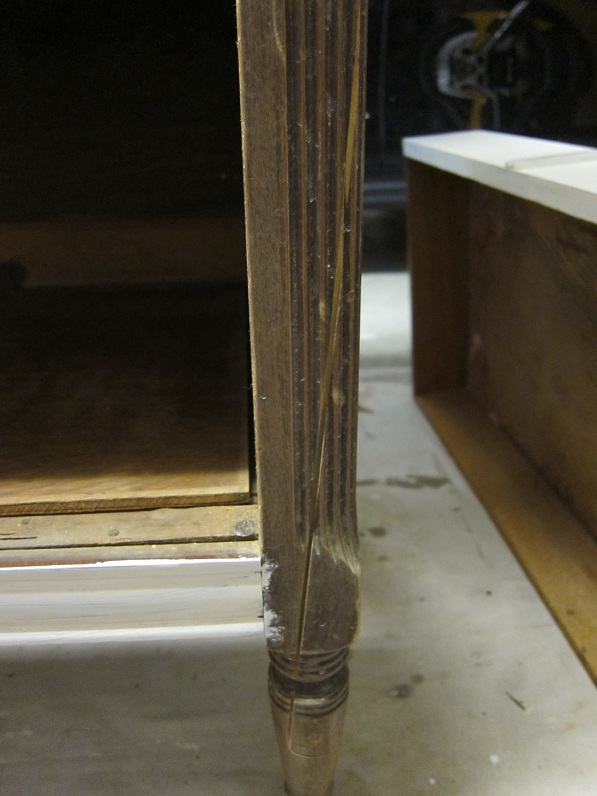
I had to get rid of the bottom two drawers because of the cracking and missing pieces of veneer and wood, but I couldn't get rid of the front right leg of the dresser. Structurally it was fine, but it looked like someone had taken a knife or sword to it!

Because this was a free dresser, I didn't want to spend any money repairing it (especially because I was thinking of keeping it for myself). But I realized if I repaired the dresser to a decent state, I might be able to sell it and make more money to buy more furniture! As we all know, you have to spend money to make money! Plus I figured this was the perfect opportunity to learn how to use wood filler.
There's probably a better product out there, but I saw this Minwax Stainable Wood Filler in the store for about $9 and without looking up any recommendations from other blogs, I went ahead and bought it.

One thing I learned is that it's better to buy a tub of this stuff instead of getting the tube. The wood filler is thick and paste-like and for some reason it wouldn't come out no matter how hard I squeezed the tube. I think air built up in the tube every time I used it, so I had to clean it out with a toothpick a few times between each use. Pretty annoying. The directions on the tube said to use a putty knife, but I first tried to use a toothpick to apply the filler to the thin slice in the dresser leg. That was a definite no-go. The paste did not stick to the toothpick. The putty knife was WAY more effective.
Another tip is to apply the filler directly to the putty knife if you're trying to get the filler in a small space. Initially I tried to squeeze the stuff onto the dresser, but most of the time it would just fall right off onto the floor. It was much easier to apply the filler to the putty knife, then slide the knife against the dresser leg to fill in the slice. And although the toothpick wasn't a great tool to use to apply the filler, it was helpful with removing the filler from the small details in the wood that I didn't mean to touch.
Here's what it looked like after I filled the slice and let it dry (about 2 hrs later).


I sanded the filler down after I took these pictures and used the toothpick to help clean up a few more areas. I haven't painted over it yet, but can't wait to see how it turns out! I'll make sure to post those pics once that's done.
And although I forgot to take a picture of the second drawer ahead of time, here's what it looked like after I patched the left corner where a piece of wood was missing (I had already removed the veneer layer from this drawer).

Good as new! And hopefully it'll look even better once it's painted!
Ohh this is so great to know! My husband's nightstand is beginning to crack (bummer) but I am going to try this out! Thank you for sharing this!
ReplyDeletethanks for the great tips. i always seem to have trouble with wood filler.
ReplyDelete-emily
nestnestingnested
wow that is looking good guess what ? I have that exact dresser in my home! I bout at a yard sale in about 1976 or so. Mine is in a little better condition but the veneer is cracked off in a few spots too. Maybe I should try your trick with the filler stuff and chalk paint it
ReplyDeleteKAT
Emily- I bought this product and hated that I could never get the stuff out of the tube! It was a sheer waste of money because it ended up drying up completely. At least I now know that it wasn't just me who had issues with this crazy tube! lol I now have a metal container of wood filler to use.
ReplyDelete:-) Sue
I love your posts! I always learn so much. I can't wait to see this one done.
ReplyDeleteI’m trying this wood filler now for the first time and came to the internet to see if others had the problem I am having and how to deal with it. The difficulty getting the product out of the tube is very annoying. I’m at least glad to know it’s not just me. I’m tempted to cut the thing open to finish my project as I don’t see it ever being worth using again in the future.
ReplyDeleteFinding a reliable woodworking shop near me makes a huge difference when planning custom wood projects. At Log Home Shoppe, quality craftsmanship, attention to detail, and natural wood finishes truly stand out. From custom furniture to log home components, their skilled team delivers durable, beautifully crafted results that enhance both rustic and modern spaces. Woodworking Shop Near Me
ReplyDelete