
The hunt to find the beauty in the beast. Escapades into the world of salvaging, upcycling, and repurposing.
Tuesday, July 10, 2012
Thursday, June 14, 2012
Living and Dining Room DONE
Although the rooms are sparsely and randomly decorated, and some furniture still needs to be purchased, painted, or moved, the living and dining rooms are done!
Here's what it looked like when we first bought the house back in March.


And here are all the grueling changes my husband and his father made. It took a total of about 3 months to complete.


Here's what it looked like when we first bought the house back in March.


And here are all the grueling changes my husband and his father made. It took a total of about 3 months to complete.
- Removed wood paneling and all molding from walls
- Removed carpet in living room and laminate in dining room.
- Removed old insulation and added new thicker insulation
- Hired a contractor to put up sheetrock on 5 out of 6 walls
- Primed and painted walls and ceiling
- Added a layer of plywood in both rooms to even out the floor
- Installed bamboo floors
- Painted and put up new crown molding, baseboard molding, molding around windows, and molding around doorways/hallways
- Replaced chandelier
Our renovation work in fast forward.


With a big sigh of satisfaction and relief, I bring you to the present. Welcome to our home!


Side-by-side comparison.


The light green couch is the only brand new piece of furniture we purchased for the house (if you're not counting 3 Ikea bookcases). It is THE most comfortable couch I've ever owned. The other new item I bought for the living room was the rug. It was a recent purchase from HomeGoods and I'm now seeing them pop-up everywhere in other bloggers homes. For once maybe I'm ahead of the curve?
A new "old" purchase we made is the farm-style dining room table with painted green legs. I bought it from a nearby consignment store and thankfully they delivered it for only $25 (cheaper than I would have had to pay for a UHaul!). We do have the leaf and it extends to a square-shape rather than a rectangle which is perfect for the size and shape of the room. As mentioned in previous posts, I plan on painting the dining chairs as well as the little hutch you see in the left corner of the first picture.
Scattered here and there are my older furniture project pieces and yard sale finds like the coffee table, white bureau, painting on the bureau, floor lamp, and the rocking chair. The piano was my childhood piano from my parent's house that we moved up from Houston. It was difficult and awkward to move, but I'd like to think it was worth it to my husband considering Annie plays it everyday now.
We love being able to use these rooms now!!! We're finally able to "live" in our new home and use the furniture instead of navigating around and over it. Another big THANK YOU to Brendan and Poppa for all of their hard work. Also thanks to Momma (Brendan's mom), Uncle Jenny (yes we call her "Uncle"), and Uncle Terry for coming over and helping us when we needed it the most. And of course, thank you to my mom, dad, brother, and his fiance Jennifer for our wonderful washer, dryer, and stove. Thank goodness for family!!!
10 more days until my due date. EEEEEEEEEEEE!
Love the Beasts,
Emily
Monday, June 11, 2012
Smell Your Furniture and Other Finds
Here are my latest yard sale and curbside finds from the last few weeks. As you've likely noticed, yard sales are popping up everywhere and I can never pass them up, especially if I see chairs. Chairs are my sirens. They sing to me and lure me in no matter their condition.
This little rocking chair was a $6 yard sale find.

It had a cushion and a faint cigarette + air freshener smell. I washed the cushion twice, sat it out in the sun for 2 days, then promptly put it in our basement for future use (most likely for outdoor seating or for kneeling when gardening). The chair was scrubbed twice with vinegar and washed it down with Murphy's Oil Soap. It also sat in the sun for about 2 days and after that the smell was gone. Thank goodness! I was starting to think I was on a "nicotine streak" and everything I found or bought would have a cigarette smell to it (like the bag of batting I bought at Goodwill...boo). I'm not sure why I'm just now encountering these issues, but I've learned my lesson and I smell every piece of furniture, even the free stuff, before I bring anything home. Sure, I may look like a massive freak but it saves me a ton of trouble and frustration!
I also picked up 2 of these chairs for our dining room at a yard sale.

Sorry I'm too lazy to take a picture of it by itself, so it's a cropped close-up from another picture. These chairs will eventually be painted. The farm-style dining table we bought didn't come with any chairs and I really like the miss-matched chairs look. I'm thinking white or yellow for all the chairs but they likely won't get a makeover for at least 6 months. Hey! Don't give me a hard time! I'm due in 2 weeks!
Last of all, I picked up this little sewing bench for free this past Saturday during our neighborhood yard sale day.

This will make a great little storage box for Annie and the new baby. Or maybe an end table/nightstand? Or use it to hold toiletries for guests in the bathroom? Well I didn't know exactly how I'd use it, but I knew I could give it a quick makeover immediately. After wiping it down and letting it sit out in the sun for a few hours, I recovered the plastic fake-veneer top with one of my favorite fabrics. The blue fabric was what helped me sell one of my first huge consignments back in Houston. Oh yeah, still love that dining set!


And here's a preview of my next post. A peek at the new crown molding and new molding around the windows. So pretty! Yep, I'll finally show you the dining room and living room makeover. I know, I can't believe it either. The rooms are done!

Love the Beasts,
Emily
This little rocking chair was a $6 yard sale find.

It had a cushion and a faint cigarette + air freshener smell. I washed the cushion twice, sat it out in the sun for 2 days, then promptly put it in our basement for future use (most likely for outdoor seating or for kneeling when gardening). The chair was scrubbed twice with vinegar and washed it down with Murphy's Oil Soap. It also sat in the sun for about 2 days and after that the smell was gone. Thank goodness! I was starting to think I was on a "nicotine streak" and everything I found or bought would have a cigarette smell to it (like the bag of batting I bought at Goodwill...boo). I'm not sure why I'm just now encountering these issues, but I've learned my lesson and I smell every piece of furniture, even the free stuff, before I bring anything home. Sure, I may look like a massive freak but it saves me a ton of trouble and frustration!
I also picked up 2 of these chairs for our dining room at a yard sale.

Sorry I'm too lazy to take a picture of it by itself, so it's a cropped close-up from another picture. These chairs will eventually be painted. The farm-style dining table we bought didn't come with any chairs and I really like the miss-matched chairs look. I'm thinking white or yellow for all the chairs but they likely won't get a makeover for at least 6 months. Hey! Don't give me a hard time! I'm due in 2 weeks!
Last of all, I picked up this little sewing bench for free this past Saturday during our neighborhood yard sale day.

This will make a great little storage box for Annie and the new baby. Or maybe an end table/nightstand? Or use it to hold toiletries for guests in the bathroom? Well I didn't know exactly how I'd use it, but I knew I could give it a quick makeover immediately. After wiping it down and letting it sit out in the sun for a few hours, I recovered the plastic fake-veneer top with one of my favorite fabrics. The blue fabric was what helped me sell one of my first huge consignments back in Houston. Oh yeah, still love that dining set!


Emily
Thursday, June 7, 2012
Guest Room Makeover with Painted Wood Paneling
The guest room is now ready for visitors! When my mom comes to visit next week, it won't smell like urine or look like crap :).
We went from this:

To this:

We replaced the carpet, painted the walls and molding, and painted the wood paneling. It is one of the more dramatic changes we've made to the house and we love how it turned out.
To get a better idea of what we were working with, here's a clearer picture of the wood paneling minus the fancy burgundy carpet.

As mentioned in the last post, we sanded off the gritty build-up that was on the paneling and caulked the wide spaces between each board. We then painted 2 coats of Kilz primer followed by 2 coats of Olympic satin white paint. The same white was used for the molding (which was originally an off-white yellowy color). Here were the progress pictures of painting the wood paneling white.


We then painted the walls with 1 coat of Kilz primer followed by 2 coats of oops paint from Behr. Even now I don't know what the color is called, but it's a dark chalky blue that I probably never would have picked out myself. Can't beat a can of $7 paint versus $36 though! And I love that the color is a bit unexpected. Although it's dark and you may think it makes the small room seem even smaller, it's really lovely and still makes the room feel open.


We went from this:

To this:

We replaced the carpet, painted the walls and molding, and painted the wood paneling. It is one of the more dramatic changes we've made to the house and we love how it turned out.
To get a better idea of what we were working with, here's a clearer picture of the wood paneling minus the fancy burgundy carpet.

As mentioned in the last post, we sanded off the gritty build-up that was on the paneling and caulked the wide spaces between each board. We then painted 2 coats of Kilz primer followed by 2 coats of Olympic satin white paint. The same white was used for the molding (which was originally an off-white yellowy color). Here were the progress pictures of painting the wood paneling white.


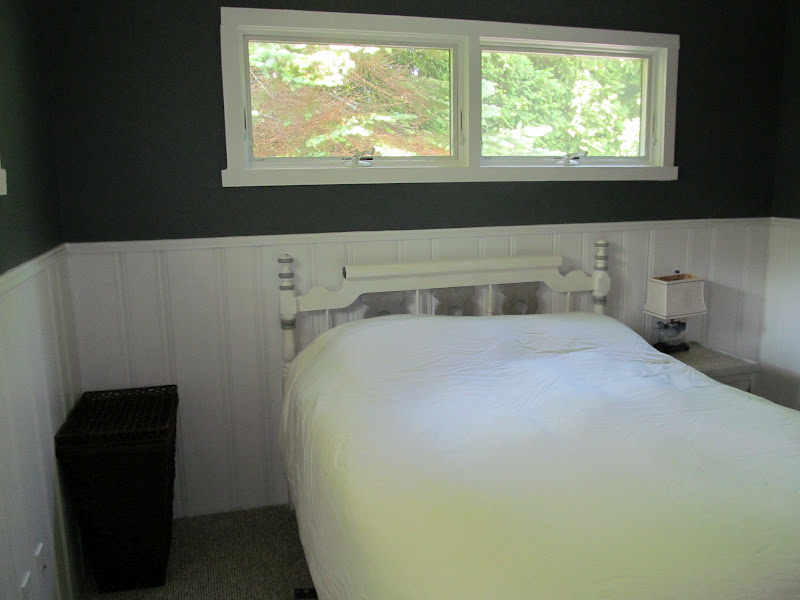

Here's a close up of the painted wood paneling and walls.

The pictures don't really do the room justice and I'm not really great at decorating rooms, but I'm happy that the colors in the room tie-in well with some of my older furniture projects and finds. The headboard was an estate sale find I painted almost a year ago from this post. The side table was painted, mod-podged with vintage dictionary pages, and the broken knob was covered in twine. And the duck teapot turned lamp was a thrift store find. The hamper is the newest purchase from a nearby yard sale.
Hope you can appreciate the changes as much as we do!
Love the Beasts,
Emily
Friday, June 1, 2012
Bye Bye Dog Pee, Hello New Carpet
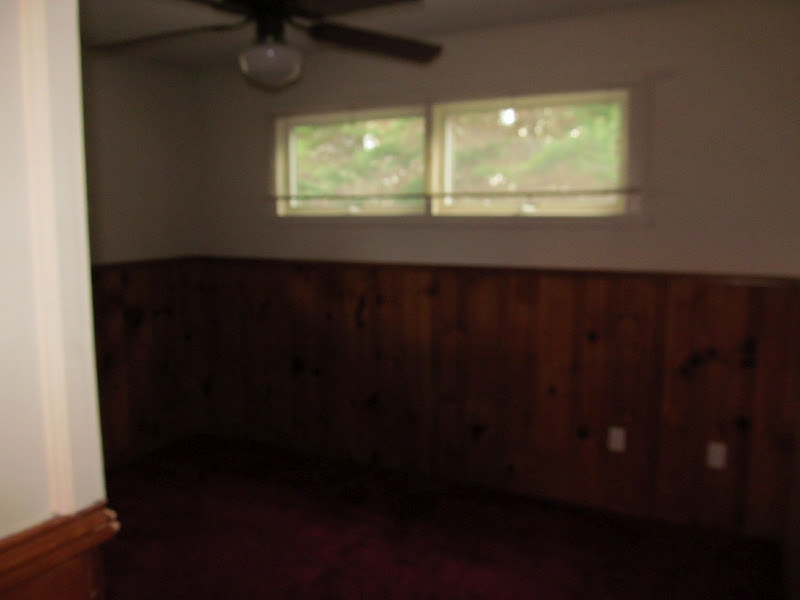
The guest room in our new house started out like this.

It's a dark and blurry picture, but that pretty much describes the room. Dirty dark burgundy carpet and walls covered halfway with dirty paneled wood. Annie's room is much bigger, brighter, and is part of the new addition to the house, but had the same dirty carpet and a slightly mildewy smell to go along with it. The worst part of the carpet was in the hallway leading to the bedrooms from the living room. It was beige and had a HUGE dark stain. You can see it on the floor at the very left in this picture.

We had hoped we could clean the stain, but it was not meant to be. 3 different types of carpet cleaners later and the stain was lighter, but still visible. We thought we could live with looking at the stain, but things got worse. By cleaning the area, the carpet became damp and began to smell. Not just a mildewy smell, but a urine smell. Hidden odors in the carpet and foam underneath were released and we realized there was no way we were going to be able to ignore it. We had heard from our neighbor that the previous owner had 2 dobermans and we think the dogs used this as their main pee place (who knows why they couldn't use the 1 acre land surrounding the property). We knew steam cleaning the carpet wouldn't permanently fix the issue, so we decided 2 weeks ago to replace the carpet in the hall, Annie's room, and guest room. We would have liked to put in the bamboo hardwood in those rooms too, but with the new baby coming in a month we just wouldn't have had enough time. Of course now with the carpet purchase we hit the max of our renovation budget. No more big renovations or improvements for at least another year!
We did however save money by removing the carpet by ourselves...and by ourselves I mean my husband, his father, and little brother. At 36 weeks pregnant I can hardly bend over without experiencing a Braxton Hicks contraction. Thank goodness we pulled up the carpet ahead of time though. The huge pee stain went all the way through the carpet, foam, and into the plywood underneath. It smelled and looked horrible, and we knew if we didn't remove the wood it wouldn't be long before the new carpet began to smell and stain as well. There were 3 other small areas in the plywood in Annie's room that had this same issue, so the guys had to cut out the ruined sections of plywood and nail in new boards. A little more money and time spent on things we didn't know were going to be issues, but we expected these types of things to pop up before we bought the house. It sucks to deal with, but it's better to fix it now then spend more money, trouble, and frustration fixing it later.
Here's what the guest room looks like without carpet. Yet another kind of vinyl flooring in the house! Yay!

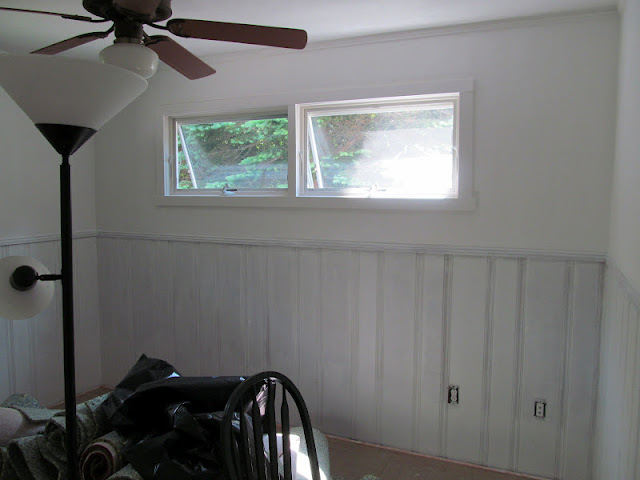
Of course to give ourselves even more work, we decided to go ahead and paint the wood paneling and walls in the room before the new carpet was installed. We were going to do this maybe 6 months to a year down the line, but we knew it would be a lot easier to do if we didn't have to worry about getting the carpet dirty.
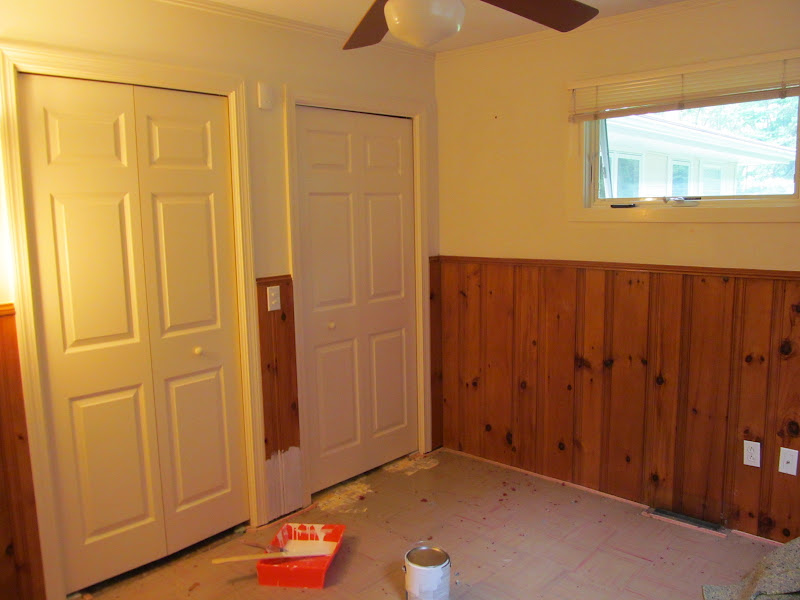
The guest room is one of the original rooms in the house. Our home started out as a small 2 bedroom beach house. You can tell how old it is by looking closely at the paneling. Portions of the it were covered in this crap.

What is that you ask? I have no idea. The crap took a lot of sanding to get off. My husband thinks it's the remainder of an old messy stain/varnish job. I just can't believe the previous owners never addressed the nastiness on these walls. In one hallway in the house where there's still floor to ceiling wood paneling, they painted right over the stuff. L A Z Y!!! Brendan and his brother sanded the stuff down and then Brendan filled the wide spaces between the wood panels with all-purpose white caulk.
After cleaning/wiping down the walls and paneling, we started priming. The room looked so much lighter and brighter!

After 2 coats of primer on the paneling, we realized we would run out of time painting it all before the carpet was scheduled to be installed. So we only painted the bottom 6 inches of paneling with 2 coats of white paint before the carpet was installed yesterday morning.


Although we clearly have a lot more painting to do, the room looks so much better. I think we've brought it back to this decade and best of all, there's no more urine smell wafting into the room. Hooray!
Once painting is completed and furniture has been moved back into the room, I'll post pictures. And it you're wondering, we plan on painting the walls an oops color I got from Home Depot. It's a deep chalky blue. Maybe a bit dark for a small room like this, but much more interesting then the other paint colors we chose for our bedrooms!
Love the Beasts,
Emily
Thursday, May 24, 2012
Retro Chair for Spring with Painted Accents
I finally FINALLY finished this chair from September 2011. Before she was dull, lifeless, and contained way too much plastic (the fabric was icky vinyl).

NOW she makes a statement!

NOW she makes a statement!

I bought the chair as a Christmas gift for my sister-in-law Jenny, but the holiday quickly passed and the chair was only halfway done. It then became her birthday gift which we just celebrated this past weekend. The fabric was purchased up in Maine from one of my favorite stores, Marden's. I think the retro poppy upholstery fabric was $2.99 a yard. CHEEEEAP! Because Jenny likes bright colors in her home, I chose to paint the wood with Krylon Spray Paint in Emerald Green. The green didn't match any of the colors in the fabric, but it provided a nice contrast to the yellow and poppy red and helped me achieve the "LOOK AT ME I'M INTERESTING AND UNIQUE" look.
We've been in CT for 6 months now but I didn't actually get the chair down from Maine until last Friday. I had finished painting and re-upholstering the seat and front before I left, but I couldn't finish the back until the ply-grip/curve ease I bought online arrived. About a week later, it came and after a couple hours here and there nailing on the ply-grip, putting in some hammered upholstery nails, and stapling muslin to the bottom, it was done! By the way, I can't figure out how you guys staple ply-grip. The staples never seem to go through the metal for me. It could be because I'm using a electric instead of a pneumatic stapler. And if you're wondering, I didn't have any of the black cambric cloth for the bottom of the chair, so instead I used some old muslin my mom gave me. It looks great although when I say old, I MEAN old. I think we've had it since the 80's.
Here's the chair in its "DONE, BUT SOMETHING'S MISSING" phase.


Here's the chair in its "DONE, BUT SOMETHING'S MISSING" phase.


This is when I decided to take a page from a few other blogger's books and highlight portions of the fabric with paint. I bought some green acrylic paint and highlighted random poppy flower stems.

Now the fabric and paint color can live in harmony.


'
In her past life she was a bore.
Now she's quirky and fun!

You may think the colors aren't "typical" for me, but they're still my style all the same. I promise you this won't be the only piece of furniture that I ever work on that has bright and outlandish colors.
Happy Birthday to Jenny! I'm so glad you like the chair and you're not afraid to display it in your home :).
Love the Beasts,
Emily
Linking to: Furniture Feature Friday @ MissMustardSeed.com
Subscribe to:
Posts (Atom)