Tuesday, June 28, 2011

Cottage Headboard Reveal

I know I know, I've been such a tease about my headboard. So without further ado, here she is! A full or queen size headboard perfect for a cottage or beach house!

I've already shown you hundreds of times, but she started out like this.
Pretty, but there were discolorations in the stain and pock marks all over the place. I thought about refinishing the wood, but I realized that the work involved wouldn't justify the overall cost and worth of the headboard. And in my opinion, this style won't sell well unless it's given a new look. 

So after filling the pits in the wood with Minwax wood putty, I lightly sanded the headboard all over. Here were the ingredients used to get the below look:
  • 2 coats of cheap white Wal-mart paint (ColorPlace brand) all over
  • 2 coats of my free Sherwin Williams Uncertain Grey sample paint on the details
  • 2 coats of Behr Creamy White on the rest
  • 1 test coat of Minwax Dark Walnut stain on the middle section


Argh! Barf! The glaze came out horrible. I tried rubbing off as much as I could, but it was still much too brown and way too streaky. I was not happy. Here's a close-up of what anger looks like.

Back to the white paint again! I painted 1 coat of the Creamy White over the glaze and hoped that it would be enough to cover it up. It wasn't, but it actually worked out in my favor. The glaze was now just right! 

I added a good amount of water to my Dark Walnut stain to achieve a similar look on the rest of the headboard, and ended up with happy results. The glaze is darker on the grey details because I wanted it to complement the patina on the circular brass details on the side.

And finally finally, she is done.


I think she'll look so lovely in a room full of white and grey. So glad she's done!

And I keep talking it up, but I've got an awesome 100 Followers giveaway I'm working on for Thursday! I haven't reached the number yet, but I don't really care anymore. Hopefully some of you will follow me once the giveaway is available!

UPDATE: For those of you who are dropping by from a party, the giveaway is officially open! I would love if you entered here! 

Emily

Linking to:
Domestically Speaking
PhotobucketTransformation Thursday
Stuff and Nonsensevif187
Furniture Feature Fridays

Monday, June 27, 2011

A Little Peek and Good Intentions

Headboard is all painted and glazed! Woooooo! It took forever and I had some last minute issues, but all of the hard work is finally out of the way. A little waxing tomorrow and the girl will be heading to Grace Hart & Co.

I don't want to show you any pictures of the headboard until it's completely complete. So for now, here's a little peek. Tomorrow will be the reveal.

And I forgot to post about the great weekend we had! My husband made the most wonderful dinner for my family. It was basically Grill-fest. Grilled bread, grilled corn, grilled romaine salad, grilled salmon, and clams cooked in white wine sauce (no the clams weren't grilled). It was delicious. And Annie's been having a ball in her new inflatable pool on my brother's roof deck. She loves scooping out the water and watering my lemon tree. And by watering it, I mean she walks over to the tree and then pours the water all over herself. The intention is there though! 

My family went to Grace Hart & Co. for this first time on Saturday to see my furniture. Luckily for them, they had my burlap chair in the window so they were able to see one of my pieces before even walking into the store!


They liked the shop, but had a better time trying to get everyone to admire and buy my furniture. Here's an example of what my brother would say in a loud serious tone, "Wow! I have never seen a chair like this before. What? Is that covered in burlap? That is so unique. You can't find a chair like this anywhere. And for that price? What a steal! I want to buy this but can't seem to find my wallet. I will walk out to my car right now to get my money. I hope no one snatches it up while I'm gone!" Aaaaaaaand scene.

It didn't work and it may have caused some negative reactions (people kept giving us weird looks and avoided walking near us ...we seemed to be scaring them :D), but I appreciated it. We had a great time laughing at ourselves and hey, the intention was there!

Emily

Friday, June 24, 2011

Recent Sales: Mirror and Le Baron

I lied. My headboard is not ready for her reveal today. The stupid thing requires a couple more coats of paint then I thought it would. I guess that's what I get when I try to use up all my cheap paint. So I can't participate in any parties today, but I can share with you my recent sales! Woo-hoo!

I sold my big white mirror which I thought would go quickly, but it took about 2 months and they sold it for 20% off   the initial price.

Here's what it looked like when I bought it.

And I sold one of my first upholstery redos! Le Baron belongs to someone else now :). And they paid full price! Yippee!

Some less flattering pictures taken indoors.

Some of you may remember he used to look like this.

I'm disappointed that the headboard isn't done yet, but thrilled that I've got some money coming in! Hope more stuff sells this weekend! And the new goal for the headboard is Sunday. Please give me a hard time if it's not complete by then!

And oh yeah, I'm only 9 followers away from hitting 100 and I'm putting together a small giveaway. Please PLEASE follow me if you haven't yet because I really REALLY want to have an excuse to put a cute package together!

Have a fun fun weekend!
Emily

Wednesday, June 22, 2011

Icebox Side Table

Last week I mentioned that I found my go-to thrift store and was able to bring home something great. Here he is!

It's a walnut icebox-style side table/end table/cabinet with storage. I've always loved the old icebox refrigerators but they're usually expensive, extremely heavy, and can take up a lot of room. This is the next best thing! It's a White Clad made by Simmons Hardware.

Love the brass against the walnut, and no rusting to be seen! It's in almost perfect condition so I decided not to change a thing! Just a bit of cleaning and vacuuming (to get rid of the spiderwebs) and today I brought it in to Grace Hart & Co. (the store I consign with).


Don't you love the door handle? It's the best part. I was very tempted to keep the table, but I'm sticking to my promise of not holding onto anything that I don't need. So bye bye icebox! Hello headboard.

Hoping to have her reveal on Friday. Hooray!

Emily

Sunday, June 19, 2011

Father's Day Mini Painting

Happy Father's Day to all the Dads out there!

This year for my husband I painted a tiny 4x4 canvas. He loved it! Couldn't stop giggling :).

Cambridge (MA) has so many important memories for us. It's where our daughter Annie was born, where he and I first met, where we both had apartments, and where we both biked. We miss the Boston area a lot, but we're just happy to be together!
 

Hope everyone has a wonderful Father's Day!

Wednesday, June 15, 2011

Simple Wire Bottle Carrier Redo and Proof I'm Still Working on Furniture

I finally found MY thrift store in Houston. You know, the store where you always find great deals AND great furniture. It's the same place I got the mission style chair I recovered in burlap last week. Today, I saw this black wire basket while I was waiting in line to buy a cabinet (a post for another day). It's a bottle carrier, probably not vintage, but perfect for my tiny collection of 2 blue glass mason jars.

Now we all know we can't leave the basket as is! That would be criminal! So I took some jute twine and wrapped it around the top handle using hot glue. One side is a little thicker than other, but had to tuck some twine underneath so that there was no chance that the handle would unravel. I started messing around with some dropcloth canvas and considered covering the bottom of the basket with it, but realized it would cover up half of whatever I displayed in the basket. Then I remembered a piece of hardware I bought at the Round Top Antique Fair and hung it on the front using the twine. The result was cute, rustic, industrial, and whimsical! Oddly enough, it was exactly the look I was going for!

You like? I hope so! Now I just need 2 more bottles to make my basket complete! And in case you're curious, the bottle on the left is a Ball jar I bought at an estate sale and the right is a Atlas jar I also picked up at Round Top.

And just so you don't think I've abandoned the furniture ship, here's what I've been working on lately. Layers and layers of white paint on a headboard. Usually I wouldn't like this style of furniture, but I loved the round brass details on the top.       

The paint I'm using is pretty crappy. It's one of the cheapest brands you can find at Wal-mart and requires about 4 coats to cover any surface properly. I'm trying to use it up though because I hate for things to go to waste. I'll probably only use it for 3 coats and the use a different paint for the final coat. Also, I don't know if I'm going to keep it white or use some grey/blue on the details. A question for another day!

And remember this awesome coffee table I picked up at a yard sale? (on the right)

Well it's giving me a bit of a headache. The legs weren't strong enough to hold the table top so I took it apart to see what needed to be repaired. The previous owner used penny nails to reinforce the feet to the legs, but they're way too thick and won't "catch" the wood, so it's causing the whole table to be wobbly. Boo!!! It took forever to get 8 of those long nails out! So below are pictures of the state that the table is in now. My husband is going to help me sometime next week to reinforce the whole table correctly. Can't wait to get this beast transformed!

There you go! Furniture progress. Thanks to all for stopping by! I'm almost to 100 followers. Eeeeeee! I think a giveaway is in order, don't you?

Emily

Linking to:

Sunday, June 12, 2011

Wood Filler Tips

I should have posted this during the week but completely forgot! I had all of these pictures ready, but thought I had nothing to write about because I had yet to finish any new projects. Oops!

As most of you know, I've been working on my free curbside dresser. It's been slow going because I've only been able to find a couple hours a day to work on it. It needs a lot of work in the patching and painting area. The patching part isn't too bad, but it's been a learning experience. 

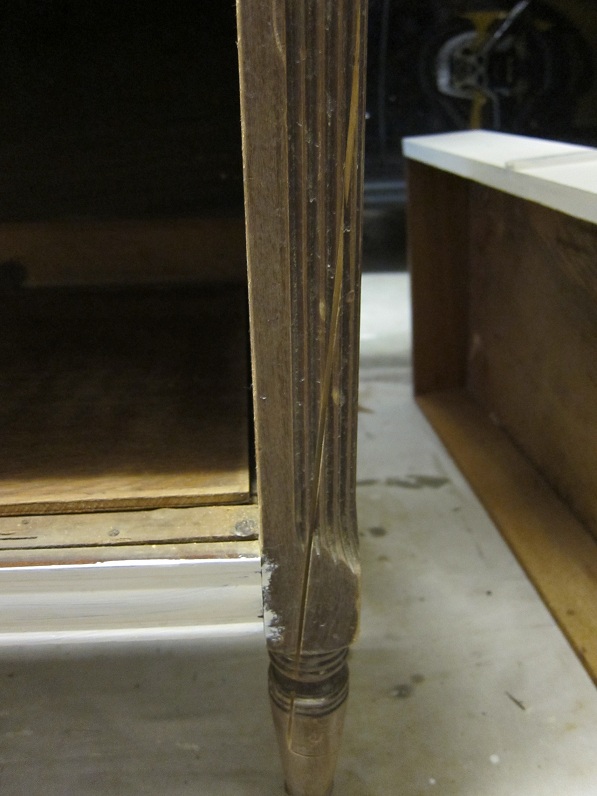
I had to get rid of the bottom two drawers because of the cracking and missing pieces of veneer and wood, but I couldn't get rid of the front right leg of the dresser. Structurally it was fine, but it looked like someone had taken a knife or sword to it!


Because this was a free dresser, I didn't want to spend any money repairing it (especially because I was thinking of keeping it for myself). But I realized if I repaired the dresser to a decent state, I might be able to sell it and make more money to buy more furniture! As we all know, you have to spend money to make money! Plus I figured this was the perfect opportunity to learn how to use wood filler. 

There's probably a better product out there, but I saw this Minwax Stainable Wood Filler in the store for about $9 and without looking up any recommendations from other blogs, I went ahead and bought it.

One thing I learned is that it's better to buy a tub of this stuff instead of getting the tube. The wood filler is thick and paste-like and for some reason it wouldn't come out no matter how hard I squeezed the tube. I think air built up in the tube every time I used it, so I had to clean it out with a toothpick a few times between each use. Pretty annoying. The directions on the tube said to use a putty knife, but I first tried to use a toothpick to apply the filler to the thin slice in the dresser leg. That was a definite no-go. The paste did not stick to the toothpick. The putty knife was WAY more effective. 

Another tip is to apply the filler directly to the putty knife if you're trying to get the filler in a small space. Initially I tried to squeeze the stuff onto the dresser, but most of the time it would just fall right off onto the floor. It was much easier to apply the filler to the putty knife, then slide the knife against the dresser leg to fill in the slice. And although the toothpick wasn't a great tool to use to apply the filler, it was helpful with removing the filler from the small details in the wood that I didn't mean to touch.

Here's what it looked like after I filled the slice and let it dry (about 2 hrs later).

I sanded the filler down after I took these pictures and used the toothpick to help clean up a few more areas. I haven't painted over it yet, but can't wait to see how it turns out! I'll make sure to post those pics once that's done. 

And although I forgot to take a picture of the second drawer ahead of time, here's what it looked like after I patched the left corner where a piece of wood was missing (I had already removed the veneer layer from this drawer).

Good as new! And hopefully it'll look even better once it's painted!