Monday, May 21, 2012

My Latest Free Finds for the New House

I've had pretty good luck with curbside finds these last few months. We needed a kitchen table and I bought a really awesome handcrafted table for $20 at an estate sale, but then I found this pine table with two matching chairs for free sitting outside the same house a week later. This one is a better fit for our oddly-shaped dinette area. The other table, which I will post about another day, is going to be either my husband's or my "office" desk.

Being about 33 wks pregnant at the time, I didn't think I could do anything with the table until well after the baby arrived. But the feeling of uselessness with home renovations struck and I stuck on my ventilator and went to work sanding and staining the table top. I sanded more than half the table before remembering to take a picture. My new palm sander was a birthday present from my husband this year. Oh how well he knows me!

Here's a closer shot of the stain that was previously on the table. It was already wearing off in a few areas and there were a few dark marks from whatever they had previously set on top.

The sander works wonders! Here it is all sanded down.

Brendan and I despise light stains and we wanted the table to look like a workshop table, a bit weathered with different variations in wood color. We knew this would work with the pine surface because you can never depend on the stain to come out even, especially when the table is not made of great quality wood in the first place. After 3 coats of Minwax Dark Walnut Stain and 3 coats of Minwax Wipe-On Poly (with sanding in between), the table was perfect!

Unfortunately, the table is still sitting outside because there's no room for it in the house. But it should be moved in by this Wednesday. In the background you can see a few of my other free finds. A pallet and 3 wood chairs.

I was so happy to find the free chairs especially because the weekend before I found out I missed out on buying 3 similar chairs for $1 each. They reeked of cigarette smoke though and there was nicotine crusted on to the backs of the chairs. I've sanded them down as much as I can and scrubbed them down with vinegar 3 times now. They sat in the sun yesterday and they're MUCH MUCH better. They smell a bit more like wood now. 

Here's a disgusting picture of what it looks like after I sanded a small part of one of the chairs. See that? Not just dust from wood or stain, it's cigarette ash. BLECH!

The 3 chairs will go with the farmhouse dining table I bought a few months ago along with 3 other wooden chairs of a different style that I found at a garage sale for $10 each. All the chairs are getting painted different colors. Priming these stinky chairs with 2 layers should keep them from stinking of cigarettes.

So yes, I've successfully found free finds that I ACTUALLY needed! Not just junk! Eventually I'll post about the furniture I did spend money on for the new house, but that won't happen until renovations are done. One day...

Love the Beasts,
Emily

Thursday, May 10, 2012

Vintage Wallpaper Step Stool

Remember this vintage wallpaper I got for free?

Well I used it again! This time I cut out the farm scenes for Annie's little step stool. I bought the stool on half-off furniture day at Goodwill for $4, but didn't love the floral paper used on top (sorry no before picture). I didn't particularly love the color of the stool either, but when I looked for new paper to cover the stool it struck me that it went with the green in the wallpaper perfectly. I used Mod Podge to glue the paper on and sealed it with the same stuff after it dried. Although the wallpaper is old, it still has a little glue on the back which helped it adhere more easily to the steps. And because Annie typically uses the stool in her bathroom, I sealed it again with Minwax wipe-on poly which should prevent the paper from getting wet and coming off.


Much better! And yes, Annie loved it!

Love the Beasts,
Emily

Monday, May 7, 2012

Thrift Find:New Chandelier!

In my last post I told you all to ignore our hideous 90's brass chandelier. I hate to even re-post a picture of it because it's so ugly. Unfortunately, I can't properly show you the transformation without it.

We bought a fun industrial looking pendant to replace it, but I later realized the pendant wouldn't provide enough light. I also felt guilty spending more than $100 on it because of our tight budget. I told myself the existing chandelier could be better if I painted it black and possibly painted over the glass shades as well. Of course, I hoped I'd eventually stumble upon the perfect chandelier for the right price at an estate/yard sale, thrift store, or on discount at the hardware store.

Well, this past Friday my little home improvement wish came true! I found a brand new chandelier still in the box for $39.99 at Goodwill. I didn't know it was new at the time because the box was taped up, but the store said they'd take it back for store credit the next day if it didn't work or had missing pieces. At the cash register, I asked them if they'd be willing to give me an additional discount and they ended up selling it to me for $25! Not the best deal I have ever received, but when you look at the prices for new chandeliers out there it's pretty amazing! Especially because this one is being sold for $180 online. When I opened the box at home I was pleasantly surprised to find all the pieces there and wrapped up in their original packaging. Even the chandelier lamp shades were still covered in plastic.

We hung our new light up that night in about 2 hours. It feels good to complete a quick project like this when all of our other projects seem to take weeks at a time.


Do you like it?! Now this was not the original chandelier-style I was going for, but it makes much more sense in our home. Once we finally finish the molding and move the farmhouse-style kichen/dining table I bought into the room, it will really tie everything together. And although you can't see how the entire room looks with the new light, you can admire our new pretty molding in the background.

Oh how I love thrift stores and cheap finds!

Love the Beasts,
Emily

Thursday, May 3, 2012

Living and Dining Room Update

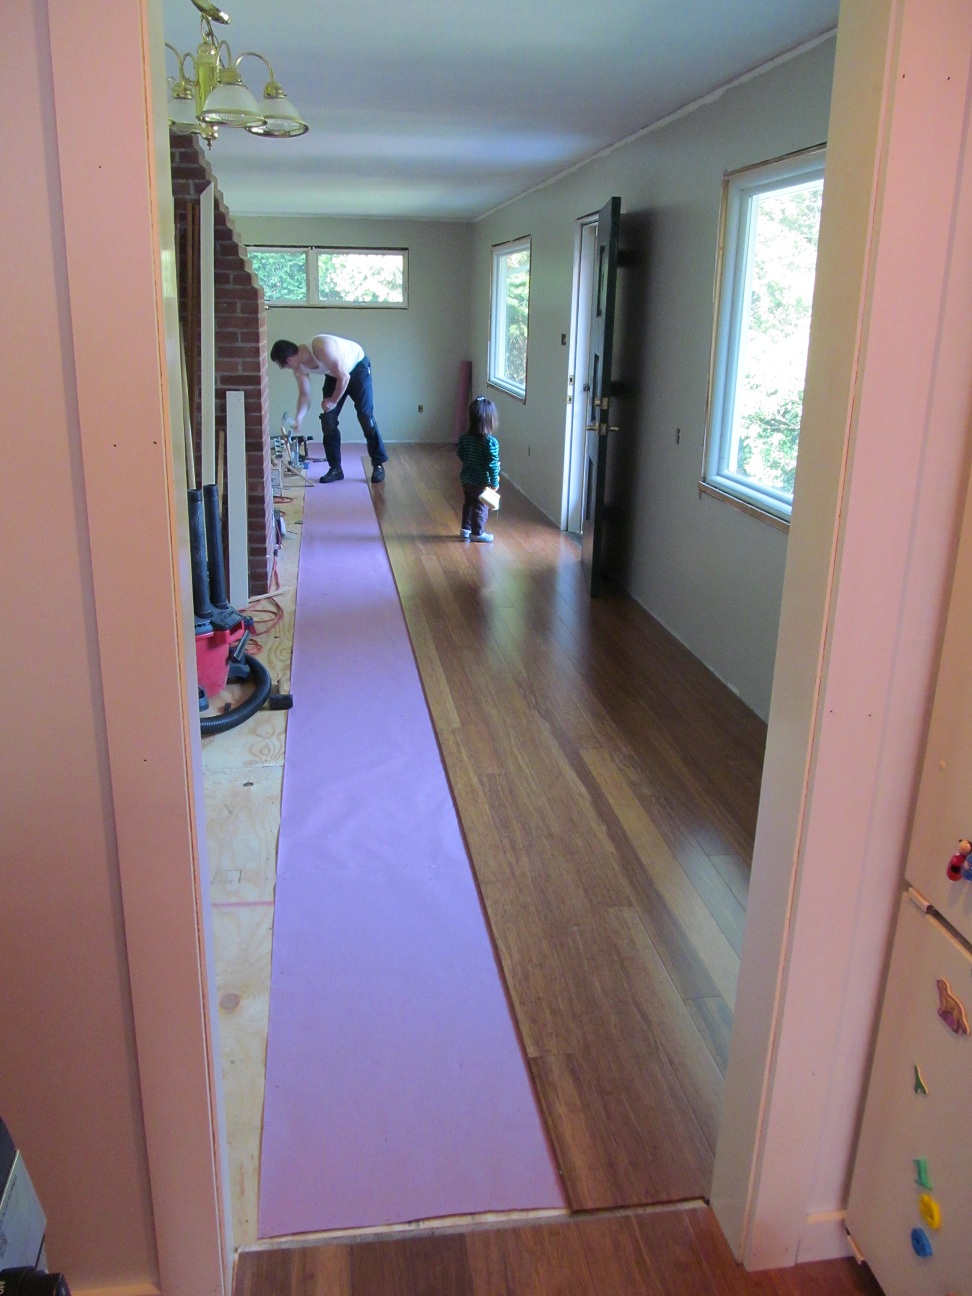
The walls and floors are done! Now we're on to the molding which is a whole new adventure. Tonight Brendan was drilling holes in the molding and drilled right into the new bamboo floor. Oh boy! Guess we'll have to invest in some wood putty.

Here are pics of what the living and dining rooms looked like when we moved in. It's really one big room that is partially separated by our brick fireplace. Ignore the brass grate, it will eventually get painted black.

We actually liked the built-in corner closet (it had no shelves so I can't call it a hutch), but when the wood paneling came down, the closet had to come down with it.

Next, my husband and Poppa tore down the wood paneling, added insulation in the walls, and removed the carpet and laminate.

Underneath the "beautiful" carpet was some beige and brown checkered laminate. We made sure to send in a test sample for asbestos and thankfully it came back negative. I guess they say it's fine to lay the hardwood over the asbestos as long as you don't try to tear it up and expose the asbestos to the air, but I prefer to have my family stay away from the stuff.

We hired a local contractor to sheetrock the walls. Basically we heard the same story from everyone regarding putting up sheetrock. It's costs the same to do it yourself as it does to hire someone (if you don't do it for a living or have the proper tools/equipment). So I ask you, why the heck would you do it yourself?!?

Once the walls were up we painted them a grayish-green called Clivenden Gray Morning in semi-gloss from Valspar. Then they started laying down the bamboo flooring again. In the second picture, Annie's helping her Dad brush off all the sawdust. Such a good helper!

And then the day came when Annie and I could walk in the rooms again. Ahh, so nice on the feet.

Sorry that all the pictures were taken at different angles. I couldn't always get to the same spots with all the tools and junk all over the place! And please ignore the hideous brass chandelier in the dining room. We bought a pendant light from Lowes to replace it, but I'm thinking of returning it. I'm not sure it will provide enough light and the living room doesn't have any overhead lighting at all. I will probably spray paint the thing until I find the perfect replacement for the right price. As of now, our priority is to stay on budget and we're right about to cross the line. 

Sigh, I really hope all of the molding is up in 2 weeks. I still need to prepare the house for the new baby and I've warned Brendan I will likely flip out by June 1st if I haven't properly nested yet. I'll bet you can guess how excited and happy that makes him! :)

Love the Beasts,
Emily

Wednesday, April 25, 2012

Framed Vintage Wallpaper and a Pretty Little Chair

I went to an estate sale on Saturday and found this amazing roll of vintage wallpaper. The first few feet of the paper was crumbling apart, but the rest was in perfect condition.

And did I mention it was free? I talked to the woman running the sale for awhile when I first walked in, and when I came back later to ask her the cost of the paper, she said to consider it as a gift :).

I love the farm scenes, the huge red flowers, and the pretty little blue birds! The colors match the paint colors in our new house perfectly. The first thing I decided to do with the paper was frame it. I just unpacked the blue-grey thrift store frame I painted almost a year ago and knew they were meant to be together. The frame didn't have a back, so I cut out a piece of cardboard to fit it from one of the hundreds of boxes that are still sitting unpacked in our house. I used modge podge to glue the paper on to the cardboard.

And yes, I have purchased a few pieces of furniture for the house already. Some new and some old. Here's a little chair I found for Annie at the Recycled Furniture in Old Saybrook for $10. They have some awesome deals there. I plan to recover the chair with a fun fabric soon.

Love the Beasts,
Emily

Monday, April 23, 2012

Tiny Birdhouses For Aine's Room

Initially for Aine's 2nd birthday I planned a birdhouse theme and bought a bunch of $1 wooden birdhouses from Michael's. Later the theme developed into "Springtime," then it quickly changed to "Let's not have a theme and just have a family birthday party on Easter Sunday." Despite the changes I still had an excuse to use the birdhouses, but I wasn't sure I wanted to paint each and every one on my own. Eventually I came up with the idea to have Annie's aunts, uncles, and what we like to call spare-aunts and spare-uncles to paint the birdhouses as decoration for both her birthday party and her new room. I bought a multi-pack of brushes and acrylic paint in colors that I thought would eventually complement the colors in her room. They turned out great! Here are the 5 completed birdhouses. We still need 2 more painted by her Aunt Jenny and Uncle Rory to finish the set.

Taking a closer look below, the one on the left was painted by her Uncle Terry and the right was by her soon-to-be Jo-Ma Jennifer. Jo-Ma is one of many terms for "Aunt" in Chinese.

The birdhouse in the middle was painted by my brother Calvin, Annie's Jo-Jo. He mixed a few paint colors to make the silver/grey color. Not exactly matching the color scheme that I planned for her room, but who cares?! It's R2D2! Could you tell?
 

The left one in this picture was painted by her spare-Aunt Julie and the right was by her Aunt MaryGrace.

Thanks to all of them for taking the time to paint these for Annie's room! Eventually I'll hang them up from the ceiling. I'm taking the idea from others in the blogging world of finding a big branch, painting it white, and hanging these birdhouses from it. We'll see how long it finally takes me to finish that project!

Love the Beasts,
Emily


Sunday, April 22, 2012

Our Kitchen...Now With Bamboo Flooring!

I don't have complete "after" pictures of the kitchen yet (mostly because the house is a mess and we're still unpacking), but here's some before and during pictures of our kitchen floor.

We started with this amazing pastel geometric laminate:

My husband Brendan and his father tore up the floor, and Brendan and his sister Jenny began painting 2 accent walls red:

Here are the first few rows of carbonized stranded bamboo going down:

And here it is towards the very end! We finally were able to move into the house when the kitchen flooring was done (although we couldn't use the dining or living rooms and didn't have our gas stove/oven hooked up yet):

After pictures will eventually follow :). Hope everyone had a great weekend!

Love the Beasts,
Emily