
SHE CAN TURN LEFT! (Zoolander reference...hope you get it...)
Here we go. I just finished one of the 4 dining chairs I've been talking about for weeks now. And get this, it's not white, distressed, or covered in drop cloth. I turned left!

I've named him "The Blue Boy" after the Thomas Gainsborough painting. It's the first thing I thought of after seeing my finished chair.

And here's a REAL side by side pic! No it's not a photoshop miracle! And yes, you are seeing double! I took a picture of one of the unfinished chairs next to my Blue Boy beauty.
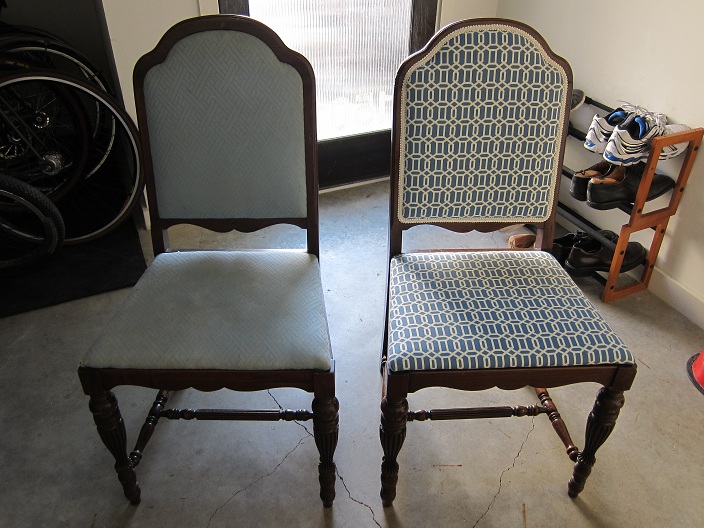
What do you think? Like the blue fabric? From the moment I saw it, I knew it would work perfectly against the dark wood. I don't know if it's everyone's taste, but I love it. It's so fun and lightens up the dark heavy, but beautiful, wood! But before I show more glamour shots, I'll go over what I did for the redo.
SHE SURE DOES LOVE STAPLES AND HOT GLUE.
The chairs were sturdy and in great condition when I bought them, but the light blue fabric was, let's say, "aged" (and I don't mean in a graceful manner). There were brown and yellow stains all over and that's when I realized canvas drop cloth wouldn't be the best fabric for chairs that you constantly eat on. Instead I bought the beautiful blue patterned fabric from Hobby Lobby.
First, I tried to figure out if I could take the seat back cushion out because the fabric is featured on both sides. Here's a terrible cell phone picture of what the whole dining set originally looked like:

You can see in the close-up there's a slit on the frame of the chairs (on both sides) which ideally would allow the seat back cushion to be removed. Unfortunately for me, the person who previously covered them had a rough time with it and created an extra crack in the wood on one chair, and glued the slits close on the others. Oh boy!

So my plan was not to patch the cracks because I have no experience in that area, and I couldn't tuck in the fabric around the cushion either because there was no space for it. Instead I chose to staple my blue fabric around the sides and add matching trim to cover the staples. Also, the trim was the perfect detail to add to balance the wood against the patterned fabric.
How I covered the seat cushion was mentioned in this post. For the seat back, I held my fabric against the frame and cut around the cushion area making sure I had enough fabric to staple. Next I pinned my fabric to the seat back cushion and began stapling away with the same basic technique I used on the seat cover. Top, bottom, right, left, repeat.


Next, I cut off the excess fabric as close as I could to the staples (which can be tricky because the frayed edges like to peek out of the trim if you're not careful), and began hot-gluing the trim. I start gluing the trim near the middle of the bottom and go all the way around, making sure it looks symmetrical on both sides.


I did the same to the back, which was a little more difficult because the cushion was flatter and there was some empty space between the cushion and the frame, but I just made sure to firmly hold the fabric before stapling and it worked out perfectly.
So here he is, the devilishly handsome Blue Boy!


Your chair looks gorgeous!!! Will you please share where you got this fabric? I love it! Thanks :-)
ReplyDeleteEmily, Great choice, it looks beautiful! I like painting things but I love wood too, it just depends on the piece. The fabric you chose really updates the chair. It will be a beautiful set when you are done!
ReplyDeleteJodie
Hi Erin!
ReplyDeleteSurprisingly, I bought the fabric at my local Hobby Lobby. I've seen it at 2 different HL stores nearby, so hopefully you'll find it near you too! It was a little expensive for me at $16.99 a yard, but fabric has been 30% off for the last few weeks so hopefully you can get lucky and catch the sale too!
Glad you like the chair! :)
Jodie - I totally agree. I like the painted look, but when the wood is this nice I refuse to cover it up! Thanks for the kind words. Hope the other 3 chairs turn out this nice!
ReplyDeleteOMJealous. Thats all there is to say about that. You did an amazing job! Thanks for linking up!
ReplyDeleteLove your guts
mandi
Your chair is wonderful! I love the fabric and it does look good with the dark wood. Very nice! Thanks for linking up!
ReplyDeleteSherry
Hi Emily! Well, you did it again my friend! Blue Boy looks lovely...er...handsome?...well, you get the idea! :-) You really do such a fabulous job and the fabric choice was absolutely perfect. Thanks so much for linking up another fantastic project to Inspiration Friday!
ReplyDeleteVanessa
I'm impressed with your upholstering approach on this - you very cleverly avoided damaging the old wood any further, big kudos! And I LOVE the fabric that you selected and the old dark wood too. Really makes the chairs look elegantly old, in a regal sort of way. Just like the painting! Great job!
ReplyDeleteThis is definitely my favorite chair that I've redone so far. Thanks to you all for your kind words and support! Now on to the rest of the chairs...and soon the table. Oh boy!
ReplyDeleteI just love that fabric.
ReplyDeleteemily!!! Guess what?? We're both featured on DIY showcase :) Too funny!!
ReplyDeletethis looks like one of the easier versions i've seen when it comes to recovering a piece of furniture! so excited to find some chairs to play with! xox
ReplyDeleteNICE job!!!
ReplyDelete