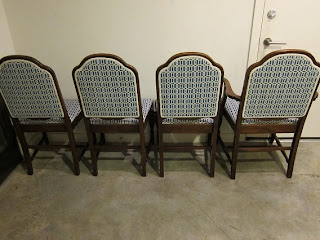
Eeeee! It's finally done! The antique dining set I bought back in February has been refurbished and restored! The chairs have been re-covered and trimmed up and the tabletop has been stripped, stained, and poly-ed. I'm really proud of my work, I think it looks pretty great but you all can be the judge of that. Also, sorry that I don't have a picture of the entire dining set together. The table is at my parent's house and the chairs are at my brother's (whom I live with), but once I get it consigned you'll be able to get the full effect!
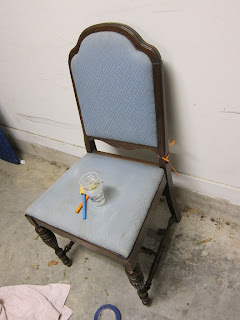
Here's what the dining set looked like when I bought it at the Spring Antique Mall. The table did not have any leaves and there were only four chairs, but I didn't mind. The price was 75% off and it was gorgeous, so I didn't need to think twice about buying it. The downsides were the dirty blue worn-down fabric and the watermarks and deep scratches on the tabletop. By the way, I believe the wood is walnut.


I started covering the chairs with a beautiful blue and off-white patterned fabric I found at Hobby Lobby. It's a fun fabric that in my opinion fits with any style. I would have preferred to take the seat back cushions off to completely to recover them, but the cushions couldn't be removed because the previous upholsterer had glued the slits in the wood back together. Also, at some point a few of the slits on the chairs cracked and putty was added to fill the spaces. So I chose to staple fabric around the seatbacks and add trim to the side. The oyster-color trim was also from Hobby Lobby.
I call these my "Blue Boy" chairs because it reminded me of
the the Thomas Gainsborough painting.
So tonight I finished covering all of the chairs including the bigger one with arms.
I'm taking the glamour shots tomorrow of the last two chairs I finished (because I need the natural sunlight to produce decent pictures), but here's a closer look at my "Blue Boy" with arms.
Love the dark wood and detail on the legs! I would never paint over them!
Now on to the dining room table. The tabletop was in bad shape and had two large white watermarks.
I had a feeling I was going to have to restain and refinish the tabletop, but I first attempted to salvage the original finish. I took some advice I found online to vigorously rub lemon oil over the watermarks, but that didn't do anything but make them stand out. I also tried using an iron with a cotton cloth between the watermark and the iron, but it did absolutely nothing. After those methods didn't work, I knew I had to begin the stripping process to get the old finish off. Below are some pics of the process, but you can read
more about it here. And if you're wondering, the watermarks were completely removed once the finish was stripped off.
Last week I had two coats of Minwax dark walnut stain on the table. This week I added one more coat of stain and three coats of Minwax Wipe-on Poly. Following
MMS' instructions, I used steel wool between each coat of poly and waited at least 3 hours between each application. Look at that! The table is beautiful once again!
There's still some dust I need to wipe off the table from all the stripping and sanding, but doesn't it look wonderful? So maybe you can imagine the whole dining set together if I put the two pictures side-by-side.
I hope it sells! I have a few things I'm bringing to a local consignment shop, but this is my biggest piece of furniture. I'm considering it my signature piece! I already spoke to the shop owner last month about bringing it in and she confirmed they would take it at that time. Hope they still have the space for me! I'll be posting all about the process I went through to get my furniture consigned so stay tuned!
Linking to:


