Thursday, July 14, 2011

A Rolling Dictionary

Whew! She's all done. I was going for the dry brush look, but ended up with another grey glazed piece. Oh whelps! The dictionary pages on the top and the twine knob make it more ME.

You saw how she started out in my last post, so here's what she looked like after my attempt at dry brushing.

Looks decent in the pictures, but in person it was a mess. I think because of the boxiness, the dry brush look just made it look like I was a lazy painter. I added 2 coats of Sherwin Williams Grey Screen on top of the paint I mentioned in this post to prove I wasn't a slacker. Next, I brushed on Minwax Dark Walnut stain. Apparently I have a new method because every time I add stain, I think I've gone too far and I dry brush over it to get the perfect glazed look. You may remember I did the same thing with my cottage headboard. I guess it's what works for me!

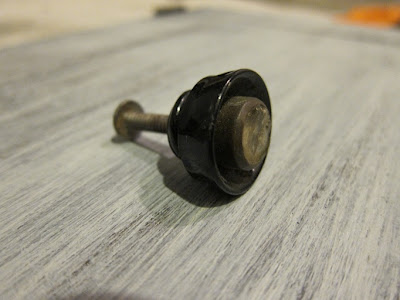
Much better! And sorry to disappoint, but I re-did the burlap knob you all loved. It just didn't look right with this cabinet. I considered buying a new knob, but reminded myself that one of my main goals for refurbishing furniture was to reuse and make do with the supplies that I had on hand. I tore off all the burlap and removed the dried up hot glue from the knob using denatured alcohol. I was back to this.

I went through several possibilities to redo the knob to match the cabinet: Use a glass wine cork (but that required cutting or drilling glass), glue on a glass stone (but the stone was too small and looked odd), wrap it in twine...that's it! I just used some twine recently to wrap this wire bottle carrier. I tied a knot in a piece of twine and hot glued it to the center of the knob. Then I slowly wrapped the twine around and around using hot glue as I went. Perfect!

Now that the knob was taken care of, I had to decide what to use to cover the top of the cabinet. The wood on top was in decent shape, but I knew it was missing something. It needed the "Emily" touch :)! So I found a dictionary from the 50's that was falling apart and mod podged pages on top. I used a foam brush and made sure to put glue both on the wood and on the back of the dictionary pages. I think it turned out beautiful! And no bubbles! I used a old plastic insurance card to smooth the paper out. I know a roller works better, but why buy one when I have a free handy little tool around the house.

Apologies for the craptastic photos. I didn't have time to take pictures during the day and I wanted to post the reveal tonight. So if you can deal with it, here are more crappy pictures of my favorite pages/words/pictures on the cabinet.

Hee hee! The goatee man never fails to make me laugh. After another layer of mod podge on top, I used a rag to apply some wipe-on poly (waiting about 4 hours in between). I also rubbed clear Briwax on the rest of the cabinet. Annnnnd...DONE!


A happy way to end the week. Can't wait to link up! See you all there!

Loving,
Emily

Linking up at:
Stuff and NonsenseFurniture Feature FridaysPhotobucketDomestically Speaking

Wednesday, July 13, 2011

I Don't Know How You Do It

...but I can't post every day. I tried, I really did! I think if you're able to write a coherent and interesting post every day, you're magic. I lose about an hour of sleep each time I write a post, and on average I only put up about 3 a week. Weak, I know. Oh well! If I can't provide quantity, hope I provide quality! Or at least some amusement.

Today is just a little post to lead up to the reveal of this rolling cabinet tomorrow night.

I finished modpodging and a bit of distressing tonight, and tomorrow I'm adding the finishing touches. Until then, I'll show you a little fix I did on the door. It was one of those annoying doors that you have to pull up and out in order to open. My sometimes-he's-a-genius husband discovered that not only was the wood warped from the heat, the top hinge was bent. You might be able to tell in this picture.

I couldn't do anything about the warpiness, but I could try to take on that evil hinge! After removing the door and taking off the top hinge, I hammered the metal straight from both sides. It looked good, but would resolve my door issue???

Yesssss! It worked! The door closes beautifully. Like butta! And of course I remembered to take a picture after I screwed the hinge on, so hope you can tell the hinge is straight now! 

See you all tomorrow! 

Loving,
Emily

Sunday, July 10, 2011

Curbside Save of the Week: Wingback Chair

My husband let me do a little yard/estate sale shopping on Saturday while Annie was napping and although I didn't find anything at the sales, I did get this wingback chair off the curb for absolutely NOTHING! It was a freebie! Hurrah!

I've seen several wingbacks in similar condition at thrift stores for prices ranging from $25-125 , but I was never willing to spend the money for both the chair and the upholstery work. Plus, most of the wingbacks weren't vintage. They were usually only about 5-10 years old. I almost picked one up off the side of the road for free a few months ago but when it was halfway into the car, I quickly took it back out because of all the fire ants crawling over it. I also realized that replacing the missing cushions would put me over budget on the redo.

So when I saw this purple one in decent condition, smoke-free, pet-smell-free, and cushion intact I figured I had nothing to lose! I mean it was free! And although it wasn't vintage I didn't mind because again, I didn't spend a penny on it. It will likely take me a few months to reupholster the chair, but I'm in no rush. If I want it to be close to perfect, I'll have to take long extended breaks in between each upholstery stage so I don't get sloppy or sick of it.

And as an update on the rolling cabinet, I'm done painting and will be glazing it soon but have decided it needs more character. So there will be some modpodging work on the top. I hope that'll give it the kick it needs to look like an "Emily" redo! Here's a progress pic on the paint. I added a coat of Sherwin Williams Grey Screen paint but it no longer looks like dry brushed, it now just looks grey. Oh well! I still like it!