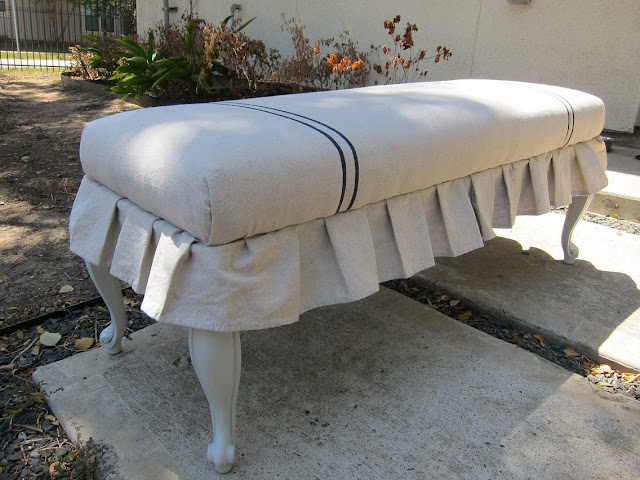
So what do you think?
I found the topless French-style coffee table abandoned on the curb a few months ago.
Then a couple weeks back my brother broke his bench.
Genius struck and a new bench was born! I painted the coffee table frame with 3 coats of Sherwin Williams Uncertain Grey and removed the upholstered seat from the broken bench. This picture was taken with 1 coat into my painting process (I dry brushed the first layer).
I liked the funky modern feel and considered keeping the dry brush look to go with the faux black leather, but I realized the coffee table frame was sticking out too much on the sides. The bench seat had to be bigger. So I did a complete 180 and reupholstered the seat by adding 2 layers of cotton quilt batting and chose painted dropcloth canvas as my fabric. Using painters tape and dark blue acrylic paint, I used a foam brush to paint 2 sets of parallel lines on each side. Now instead of faux leather, I had my faux grainsack! The fabric and batting were attached using an electric stapler and 3/8" staples.
I actually would have preferred to keep the bench this way to show off the details on the side of the table, but I had to add metal L-shaped brackets to the corners to reinforce the frame and both the wood and metal still showed a tiny bit when I put the bench seat on.
Of course that just wouldn't do! This is where the skirt came in. I decided on pleats and cut the dropcloth fabric 6" long and 256" wide and hemmed the bottom. And here's a little pleating trick of mine that hopefully you find useful in the future! Index cards! Don't know if anyone else has used them before for pleating, but I was pretty proud of myself for coming up with the idea. I chose to make 3" wide pleats and a 3"x5" index card was the perfect little guide. I folded fabric around the card (frontwards or backwards depending on the pleat) and was able to pin each pleat the exact same width. The picture below is of my practice ruffles so it shows pleats at different sizes.
After sewing the pleats together, I stapled them beneath the bench seat. I hand-sewed the back where the two ends meet and chose a convenient place where I was able to hide the seam beneath the fold of a pleat. Then I ironed the pleats out so they didn't look so shabby.
Now to the picture-less portion of this post (I was too involved with the process and forgot to get the camera). In order to attach the upholstered seat to the bench, my husband had to help drill holes in the coffee table. In the typical upcycle style, we used the original screws from the old bench. It took 1 larger drill bit for the screw to go in and a smaller drill bit so that the screw head wouldn't fall out. After a couple test runs he was able to successfully drill 8 perfect holes for the bench. Woohoo! No yelling or cursing from either of our mouths. A proud moment for us :).
Finally, she's ready for the big time! My first furniture repurpose project is a success! And both the table and the seat were free. Yippee!


