
My first frenchy chair was also my very first attempt at upholstery. I always wanted to take upholstery classes but never found the time. So when I found this chair, I decided to forget the classes. This needed to be redone right away! The MMS tutorial guided me through the majority of the process but for the more difficult areas, I referenced upholstery books I borrowed from the library.
WHAT THE WHAT?
We'll give my chair the name La Bete Premiere, French for "The First Beast" (at least I think it is). This is how La Bete Premiere looked when I bought her. She was a dirty girl.


First I unbolted the cushion of the chair and took out all the staples. Although I'm looking to get one of those staple lifter tools, I didn't have one on hand and used a small flathead screwdriver and pliers instead. My hands were sore the next day from all that prying and pulling.


Also as you can see from the bottom of the cushion. this isn't an antique chair. From the tag and stenciled numbers, I guessed this was probably from the 80's. This didn't affect how I felt about the chair though, I'm shallow and bought it for its looks! But for my future buyer out there, I tore off the tag and quickly painted the bottom so that it wasn't so ugly when they turned it over.

I was curious to know if the original foam and batting were salvageable and was excited when I got all of the staples out, but was disappointed when I found dirty batting and disintegrating foam underneath. The batting doesn't look so dirty in this picture, but it had stains and was totally limp and lose. Can't reuse that!

WAX ON. WAX OFF.
At this point the chair was ready to be cleaned and painted. As I mentioned in my previous post, there was wax all over the top of the chair and in the weave. I used 60 grit sandpaper to try to get it off, but it was futile. I went at it for about an hour then got frustrated and took a break. I started cleaning the rest of the chair with Krud Kutter and then a miracle happened. I found out exactly why everyone uses this stuff! As I started cleaning towards the top of the chair, I noticed that the Krud Kutter was taking the wax right off off the wood. Just a few wipes and I saved myself hours of frustration. I was elated! I didn't spend time taking the wax off of the weave though, it was too deep in the corners and wasn't worth the time. Once the wood on La Bete Premiere was de-waxed and clean, I ran sandpaper over her to get rid of any bumps and create a rougher surface to paint on.
I used my go-to paint Behr's Interior Semi-gloss in Creamy White. Because the paint also acts as a primer, I ended using a total of 3 coats. Again because the weave was dirty with wax, I didn't need to paint it. My plan was to upholster the back to cover the weave entirely.

Next I distressed the chair by hand-sanding all the high points. I think I did a much better job after learning from my mistakes on the tobacco cabinet! Keep in mind I didn't do this all in one day. Everything was done either while Aine was napping or when I should have been sleeping (somewhere between the hours of 9pm and 2am. I didn't get a lot of rest that week, but it didn't matter. I was too psyched about getting La Bete Premiere done!


SHE SOUNDS LIKE A NICE GIRL BUT MAN IS SHE CONFUSED.
Now that she was painted and distressed, I was ready to upholster La Bete Premiere. I went to Hobby Lobby and bought a piece of 2" thick poly foam and wandered around looking for high-loft cotton batting. Because this was my first upholstery job, I didn't realize that you had to get it online or at a specialty shop. I thought that HL would carry everything so when I didn't see it there, my impatience got to me again. I decided to get the next best thing and bought the largest roll of Hobbs Heirloom Premium Quilt Cotton Batting. I have to be honest here though, when I bought it I thought I was doing the right thing. I was confused on why the batting was so thin, but convinced myself that in the books and other pictures that it just looked thicker. Also I asked an employee at HL if quilt batting was what people used for furniture upholstery and I believed her when she said yes. What I didn't know was that she was partially right. For thinner cushioned areas, like the front frame of the chair, you should use the thin quilt batting. But for everything else you need the high-loft stuff.This is NOT high-loft batting!

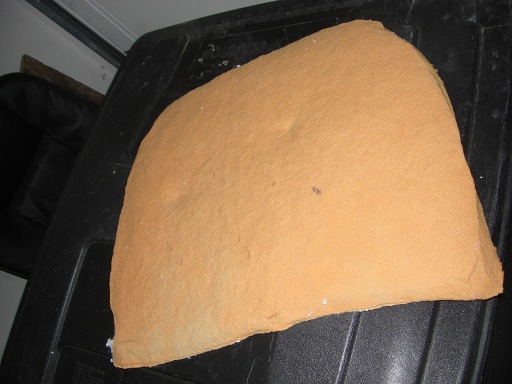
Although I didn't have the right supplies, I forged ahead and upholstered the chair. I cut the foam to match the shape of the cushion board. There were empty spaces so I filled it with the quilt batting. How did I do this with that thin batting you ask? I cut rectangular pieces of quilt batting and folded it up to fit the spaces. Resourceful, I know. And sorry, it was too hard to keep the batting in place and take a picture, so here's just a picture of the foam.

My upholstery fabric was canvas drop cloth from Home Depot. I liked the look of it on MMS' furniture and she was totally right, it was a lot cheaper than the majority of fabrics out there (about $20 for a 9'x11'). I put the canvas through the washer and dryer but didn't bleach it. The natural color is more my taste. Once it was clean, I cut a square off that was slightly larger than the cushion board and ironed it flat. Next I turned my cushion upside down on the fabric, and went to town stapling the fabric on with an electric stapler. It was my first time using one and I didn't like how I had to use 2 hands for stapling (1 for the trigger and the other to push the top of the stapler down), but it is pretty satisfying to hear the whack and see my fabric all snug on the board.

La Bete Premiere is looking more attractive isn't she?

WOW, ROOKIE MISTAKE. I FEEL SO MUCH BETTER ABOUT MY OWN SKILLS NOW.
Next up was reupholstering the back of La Bete Premiere. I tried to fold my quilt batting to fit the back area but it was too lumpy. I remembered reading somewhere that you could pull apart batting, so I tried doing it with the quilt batting. I know. Really weird Emily. Let me tell you that quilt batting does not really come apart and I ended up having a whole bunch of little squares of batting that I squished into the back frame. It looked terrible and I don't want to share the picture because I'm too embarrassed...but here you go.

Looks scary doesn't it? Yikes. Thankfully once I stapled the canvas (that I pre-cut and ironed) to the frame, it didn't look so bad. I considered myself lucky by this point.

The stapling was a bit of a pain because I wanted to make it even on both sides and I didn't want to cover up too much of the wood trim. I had to keep looking underneath the canvas to see where I was about to staple, but after awhile I got the hang of it and could do it by feeling the trim underneath the canvas. Next I cut around the canvas with scissors as closely as I could to the staples. Then I took some beige colored trim that I bought at Hobby Lobby for $.99 a yard and hot-glued it to the edges of the canvas making sure that I covered all of the staples. This was done very carefully to ensure that both sides were symmetrical and they matched the curves of the chair.

MAYBE SHE DOES HAVE COMMON SENSE AND LEARNS FROM HER MISTAKES.
Because I wasn't loving the method I used for the back of the chair, I went back to my original technique of folding batting over to cover the front frame. Much less batting was needed and I only had to cut a few extra pieces to cover the weave (you can see below on the top right corner where I added a few pieces).

Then just like I did on the back, I stapled canvas around the front and cut off the excess fabric. I hot-glued trim and then breathed a huge sigh of relief. I was DONE! La Bete Premiere was no more!

She is now La Belle Premiere (is that right? well it sounds pretty).


This is the first thing I see when I wake up now! She's in my corner of our bedroom (I finally got rid of some clutter). My first upholstery success! I love the beast that she was and the beauty that she is now.


Linking to:


Love your chair!
ReplyDeleteI'm in love with that chair too! ♥
ReplyDeleteThanks Debbie and Carol! It was fun reupholstering her and even more enjoyable to share her with everyone.
ReplyDeleteYou are amazing! I am so impressed and with a little one! How do you find the time? I love your chair!
ReplyDeleteAw, you're too kind. Thanks Laurie! But don't you have 4 children? I'm pretty sure it's hard to find time to do anything with 4 compared to my 1!
ReplyDeleteThis looks great. I tend to jump right into things too. I guess I'm too impatient and I like to learn by doing.
ReplyDeletemegan
craftycpa.blogspot.com
Bravo, Emily! She is a beast no more! I have yet to attempt any sort of reupholstering because I'm a ninny, but between you and Miss Mustard Seed, I may soon work up the nerve. Great job on this chair--you'd never tell it was your first attempt!
ReplyDeleteCongrats for taking this on...I would be too scared! It looks really beautiful! You did a wonderful job!
ReplyDeleteThanks Megan! I knew I wasn't the only one out there. And I'm the same way, I'll never know how to do it until I just dive right in. I seem to always come out of it without too many bumps and bruises, but perhaps I'm speaking a little too soon...
ReplyDeleteGorgeous makeover!
ReplyDeleteI am having an antique auction on my blog. All sorts of lovely and romantic finds looking for a new home. I hope you'll stop by.
Have a wonderful weekend.
Emily! This is beyond incredible. Vanessa and I are on the phone right now talking about your chair! Your tutorial is so detailed and I love the humor you interject. This chair is just stunning you should be so proud of your hard work. We are so excited to be following your blog now. Thank you so much for linking up to Inspiration Friday At The Picket Fence.
ReplyDeleteHeather @At The Picket Fence
SOOOO NICE! Great job. That staple work is killer, huh? It does remind me a lot of my chair too :) I like going to Warrenton during Round Top Antiques fair. The spring show is at the end of March/beg of April. Google it and you''l find it. Thanks for your sweet comments on my chair redo!
ReplyDeleteShe is quite the beauty! I did have to lol, though, at the picture of the uncovered back. Thanks for the chuckle. I'm now a follower!
ReplyDeleteBTW, I have a few fun things on my site.
ReplyDeletewww.thisandthatfromtami.blogspot.com
Thanks Erin! I love that you call yourself a ninny...not a word you hear a lot anymore! But you should definitely take the plunge and give reupholstering a chance. I bet your project would turn out better than mine considering you've now read everything you SHOULDN'T do!
ReplyDeleteThanks Lisa! It was a little scary, but I knew I could get it done. I just didn't know if it would end up looking like crap...thankfully I got lucky and it turned out pretty nice.
ReplyDeleteThanks Laura IG! I'm your newest follower and love all the items you've put up. Have fun on your upcoming trip to France!
ReplyDeleteHeather/At The Picket Fence - You are too sweet to write me such a nice comment! And thanks to you and your sister for following me. I also wanted to thank you for hosting such a great link party. It's because of blogs like you and your sister's that I've "met" so many great people who continue to inspire me everyday!
ReplyDeleteYep! My sister is telling the truth! She called me as soon as she saw your chair makeover and said, "you have to see this". You really did love that chair back to life and the beast did indeed become a beauty. :-) Great job!
ReplyDeleteVanessa
Lovely job! I adore the simplicity of the fabric you chose-you have quite an eye.Pop over to Brambly and pay me a visit, I would love to hear from you. Have a wonderful evening!
ReplyDeleteAnn-Marie
That looks gorgeous! Wow, you really took it down to the bones! Love it!
ReplyDeleteYour chair is quite lovely!! You did an incredible job on it- she looks pretty in her home! Thanks for sharing at FNF! :)
ReplyDeletelooks absolutely gorgeous...love the transformation...thanks for sharing at fridays unfolded!
ReplyDeleteblessings,
alison
stuff and nonsense
Thanks to everyone for the encouraging comments. I hope you like my future projects too! And I hope to see all of you at the next linky party!
ReplyDeleteHey Emily!
ReplyDeleteGreat Blog. You are doing a great job on it...
It is very interesting to read and you did a wonderful job on that chair. You should give her another name [not beauty though, that is just too obvious!].
Love you.... Momma
WOW! It was all worth it! What a great vignette you have to wake up to!
ReplyDeleteYou're on your way!
Good for you! You didn't give up and I'm sure many times you nearly did!
ReplyDeleteCongrats, she is a Belle!